
Your needs, this model
Does it fit your priorities?
What does the 77-110 actually mark on a plywood or drywall scan?
The exact 77-110 manual describes red proximity LEDs and a top edge indication. Scan the other direction and use the midpoint between edge marks; the manual does not describe a dedicated one-pass center cue.
Explore this need in the finder →Does the 77-110 include an explicit conditional plaster plan?
Yes, but only if the lath-and-plaster construction is not excessively thick. The maker also states a 3/4-inch maximum through drywall and plywood, so deeper or unusually dense walls remain outside this documented fit.
Explore this need in the finder →Is there a live-wire meter?
The reviewed 77-110 manual warns that nearby wiring or pipes can be mistaken for studs and instructs caution; it does not document a separate AC meter. A required live-wire-warning filter therefore excludes it.
Explore this need in the finder →Research note: This is a manual-based assessment of the exact STANLEY IntelliSensor Stud Sensor 77-110. The official six-page instructions identify the code and describe the operating sequence. No hands-on testing, ownership, measured results, exact retail package or current stock is claimed. The broad current U.S. measuring-tools page did not surface the exact code, but it is not an exhaustive historical or current stud-finder catalogue.
What the 77-110 signals
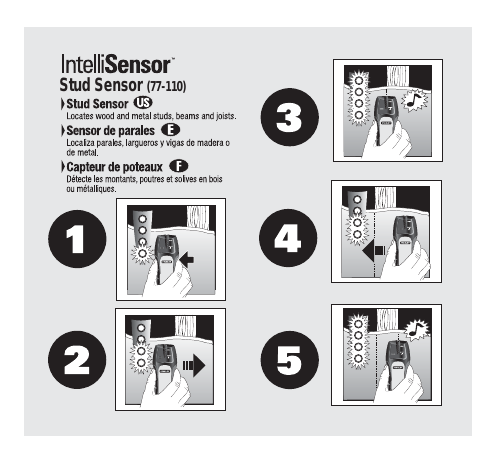
The 77-110 manual describes a stud-edge scan through drywall and plywood, with a maximum surface thickness of 3/4 inch. As the unit approaches a stud, red LEDs illuminate; the top LED and an audible tone identify the edge. The tool has a pencil-hole marker. To locate center, the instructions direct a second pass from the opposite direction and use the midpoint of two edge marks. That is a useful workflow, but it is not the same as a dedicated one-pass center indicator.
The manual gives separate center-accuracy figures for wood and metal under its stated conditions. Those accuracy figures describe the manual’s two-sided marking method; they are not a guarantee that a hidden object is a stud or that a scan on a different wall assembly will agree. The surface limit remains the more important buying boundary: a 3/4-inch maximum may be too shallow for a layered or unusually thick wall.
Conditional plaster guidance
One distinction from a generic drywall-only tool is the manual’s plaster-and-lath note. It says proper functioning is expected unless the construction is excessively thick. That is conditional support, not a promise across all historic walls. The source does not quantify an allowed plaster thickness or provide a metal-mesh rating, so the exact backing and wall build-up remain unknown. Wallpaper or fabric is described as acceptable unless metallic foil or fibers are present. For rough, sprayed ceilings, the manual suggests a piece of cardboard and says to calibrate with it in place.
Do not extend those limited notes to ceramic tile, exterior walls, metal mesh, or a wall with an unknown dense layer. If the surface makes contact uneven or varies from place to place, calibration and depth can change. The product’s existence of red LEDs does not tell the user whether a signal comes from a stud, a doubled member, wiring or a pipe.
Operating routine and battery checks
The model-specific instructions call for a 9-volt battery but do not establish whether a particular retail unit includes one. Before scanning, test the battery as the manual describes. Place the tool flat, press and hold the side activation switch, and wait for calibration. The sensor must not be placed over a stud, dense metal, wet or freshly painted material while calibrating. Keep the switch pressed as you slide slowly in a straight line. Mark the edge when the top LED and tone indicate it, then reverse direction for the second mark.
The manual asks the user to keep a free hand at least six inches away to limit interference and to hold the sensor with the prescribed hand position. That detail is easy to miss if a unit is used in a tight corner or overhead. A rough surface calls for the cardboard procedure; a smooth drywall wall should use the direct contact method. The separate procedures should not be mixed without recalibrating for the surface stack.
Hidden utilities remain a separate concern
The 77-110 manual explicitly warns that wiring or pipes near the wall surface may be detected as studs. It says to use caution before nailing, cutting or drilling and to switch off power near electrical wires. It does not document a live-wire warning meter or a separate AC-only mode. If a warning cue is an essential selection criterion, the matcher should not count this model; if the work is near wiring, use a separate verification method and never treat a silent sensor as clearance.
Who should compare the 77-110
This earlier model is a candidate for someone who needs a modest-depth edge cue on drywall or plywood and values the manual’s conditional lath-and-plaster note. The similarly named 77-100 also uses edge marks and a midpoint, but its manual evidence does not specifically list plywood. The Stud Sensor 75 / 77-075 likewise gives a 3/4-inch edge routine but its reviewed manual does not establish a plaster plan. For greater depth, the 77-115 adds three settings; for direct center-and-edge information and an AC warning, the FatMax 400 is a different model and operating approach.
Check a used or remaining-stock unit for the 77-110 model number, clean battery contacts and a matching manual. The manufacturer’s source pages reviewed here do not settle whether a particular retailer package includes a battery or any accessories. Use the model number and instruction set, not the shared IntelliSensor label, to resolve that question.
Sources: STANLEY IntelliSensor Stud Sensor 77-110 official instructions; STANLEY U.S. Measuring & Marking category (checked 2026-11-02; broad category only).
Key specifications
Key details at a glance
| Maximum stated stud depth | 0.75 in |
|---|---|
| Depth qualification | Its 3/4-inch stated limit is modest; center is a two-mark estimate. The manual does not provide a separate live-wire warning and explicitly cautions that wiring and pipes may mimic studs. |
| Documented scan modes | ['Stud-edge indication; center estimate from two opposite-direction marks'] |
| Center and edge indication | No |
| Battery requirement | One 9V battery; retail package inclusion not established |
Use the exact model’s instructions for operating limits, supplied equipment and version differences.
Sources for this review
Sources for this assessment
Check this model against your wall
Use the finder to compare documented surface limits, center/edge indications and other requirements. A match is not a safety certification.