
Your needs, this model
Does it fit your priorities?
What is the 77-075 marking routine?
The model-specific manual identifies Stud Sensor 75 / 77-075, gives a red edge LED and tone, and says to use opposite-direction marks to estimate center. It does not document center-and-edge signals in one pass.
Explore this need in the finder →Is the stated depth beyond 3/4 inch?
No. The manual gives a maximum 3/4 inch (19 mm) through drywall. A 0.7-inch threshold is within that stated ceiling; 0.8 inch is not. The source also says sensing depends on the wall rather than guaranteeing the maximum.
Explore this need in the finder →Does the manual extend its plan to lath-and-plaster or live wiring?
Neither is established: the 77-075 instructions cover drywall and plywood, but provide no lath-and-plaster plan and no live-wire meter. They instead warn that wiring or pipes near the surface may be interpreted as studs.
Explore this need in the finder →Research note: STANLEY’s Stud Sensor 75 manual identifies the product by name, and its exact front illustration labels the unit model 77-075. This assessment relies on that four-page instruction document, not on use or testing. The retail package, supplied battery, current availability and measured field performance were not established. The captured broad U.S. measuring-tools page does not show this code but is not an exhaustive finder listing.
Model identity and edge-only signals
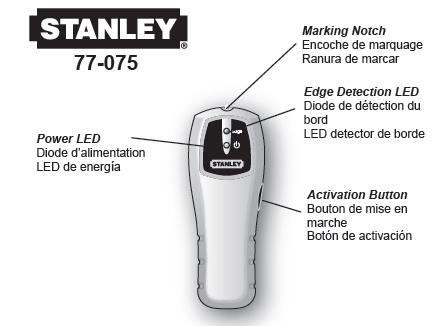
The pictured model is the Stud Sensor 75 / 77-075, with a marking notch, power LED, edge-detection LED and activation button. The manual describes electronic signals for locating stud or joist edges through drywall and plywood up to 3/4 inch. When an edge is detected, the red LED and audible tone activate. The procedure then asks the user to come from the other direction, mark the second edge and use the midpoint as center.
That is a two-direction edge routine. The document does not describe a separate one-pass center indicator, so the 77-075 should not be treated as a center-and-edge scanner. This matters when the layout needs a direct center cue or when someone expects a single signal to identify the middle of a stud. The model’s useful simplicity is also its limit: the manual offers one depth ceiling and one edge indication rather than multiple scan depths or display modes.
Depth is tied to drywall thickness and surface stack
STANLEY states “up to 3/4 inch” through drywall. The manual also discusses plywood and wallpaper or fabric where the covering does not contain metal foil or fibers. Its center-accuracy figures depend on scanning and marking from both sides and on wood versus metal studs. The 3/4-inch figure is a maximum specification, not a promise that every layered wall will return a signal at that depth. Moisture, dense layers, rough surfaces and a poor calibration position can all change what the user sees.
The 77-075 manual does not state a lath-and-plaster depth plan, a tile capability or a metal-mesh rating. Do not borrow those details from the similarly named 77-110, whose manual includes a separate conditional plaster note. For a rough sprayed ceiling, STANLEY recommends cardboard between the tool and surface and says to calibrate with the spacer in place. That arrangement differs from direct contact on drywall and should be repeated consistently for each scan.
Calibration and careful marking
The manual calls for one 9-volt battery but does not prove whether an older retail unit included it. Place the detector flat against an appropriate area, press and hold the activation button and wait for the red LED to go out while the green power indication remains. The source warns not to calibrate directly over a stud, dense material such as metal, or a wet or newly painted patch. If the red LED stays on, move to a different place and recalibrate.
Keep the button held during a slow, straight scan. Mark one edge using the notch, reverse direction, mark the other edge and use the midpoint as a working center estimate. The instructions recommend keeping the free hand at least six inches away to reduce interference. They also warn that nearby wires or pipes may be mistaken for studs and that a wide response at double studs or headers is possible. A second scan from another direction and a plausible framing pattern are better checks than trusting one isolated beep.
What is absent from the manual
The reviewed 77-075 instructions do not document a live-wire meter, AC-only mode, selectable depth or direct center display. They warn the user that electrical wiring may be confused with stud material and advise caution around walls, floors and ceilings. A required live-wire warning therefore excludes this model; no warning is not the same as evidence that a location is clear. Switch off circuits before working near wiring and use independent verification.
Who should compare this earlier reference
The 77-075 may be relevant for a modest drywall or plywood edge-marking job where the two-pass midpoint routine is acceptable. Its 3/4-inch depth ceiling resembles the 77-100 and 77-110 limits, but each model’s manual has its own surface notes: only the 77-110 document reviewed here specifically supports plywood and conditionally mentions lath-and-plaster; 77-075 names plywood but does not establish plaster use. The 77-115 adds three depth selections, while the 77-730 adds direct center/edge information and a separate live-wire alert.
Before considering an older unit, check that the label and manual match 77-075, inspect the battery contacts and confirm that the edge indicator works according to the maker’s procedure. No current stock or package configuration is established by the source record. Do not use the generic model family name as a substitute for the exact manual when wall construction or hidden utilities are uncertain.
Sources: STANLEY Stud Sensor 75 / 77-075 official instructions; STANLEY U.S. Measuring & Marking category (checked 2026-11-02; not a complete stud-finder inventory).
Key specifications
Key details at a glance
| Maximum stated stud depth | 0.75 in |
|---|---|
| Depth qualification | The manual gives only a 3/4-inch drywall ceiling and an edge-only workflow, not a direct center cue or wire warning. It recommends keeping the free hand at least six inches away and using cardboard when calibrating across rough ceilings. |
| Documented scan modes | ['Wood/metal stud-edge cue; two-direction midpoint estimate'] |
| Center and edge indication | No |
| Battery requirement | One 9V battery; retail package inclusion not established |
Use the exact model’s instructions for operating limits, supplied equipment and version differences.
Sources for this review
Sources for this assessment
Check this model against your wall
Use the finder to compare documented surface limits, center/edge indications and other requirements. A match is not a safety certification.